The action list
The action list includes functions and actions that are required when drawing a layout. We will name and describe the individual sections below.
Draw group
This section includes actions to form a draw group, to dissolve a draw group, or to remove individual objects from an existing draw group. The advantages and the handling of draw groups are explained in detail in the following section:
Body groups
If a single body is to be formed from a large number of dynamic objects, then you can use body groups. This section includes actions for handling this special type of groups.
You can find a detailed description by clicking on the following link:
Aligning objects
The actions in this section can be used to align the currently selected objects on the drawing board in a specific way. Several options are available. When you click on the action you want, it is applied to the selected objects.
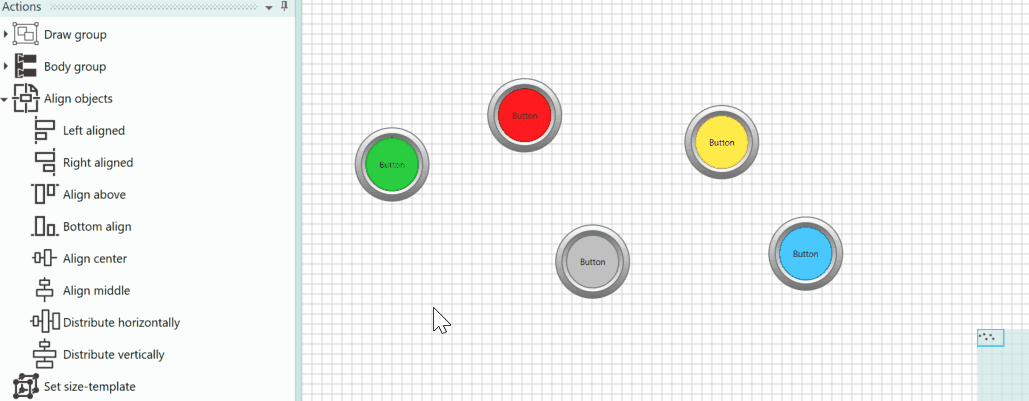
Example 1
Using the actions "Align center" and "Distribute horizontally". In this example, the push-button objects are first aligned horizontally and then distributed evenly.
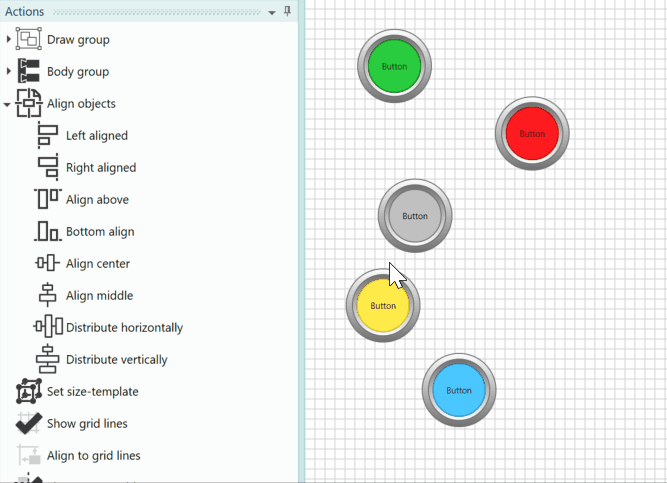
Example 2
Using the actions "Align middle" and "Distribute vertically". In this example, the push-button objects are first aligned vertically and then distributed evenly.
Setting a size template
If you want to have certain types of objects always drawn in the same size for the duration of the drawing process, you can select an object and use it as a template for other objects.
Procedure:
- Draw an object of this object type in the correct size on the drawing board and select the object.
- Click on the action "Set size template" in the action list.
- The object is set as a size template for this object type. A message informs you about the size template in the status line.
If you now place an object of this object type, click with the left mouse button on the correct position in the drawing board without dragging the object. The object is then displayed in the template size. The point you clicked on is the upper left point of the object.
The template objects are project-specific and are available again after you close and open the project again.
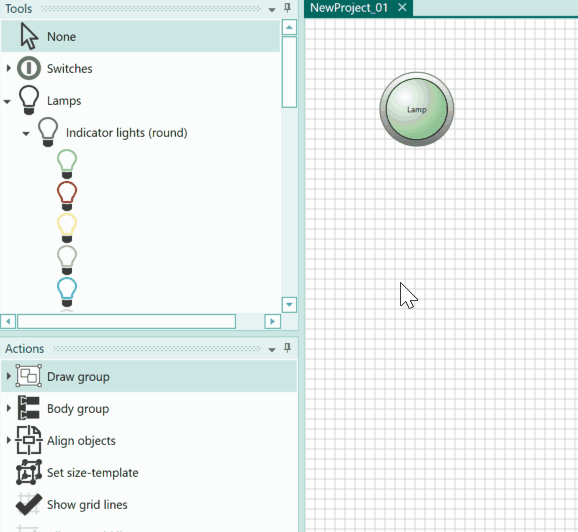
Example A lamp is to be set as a size template so that the lamp objects subsequently placed on the drawing board immediately have the same size.
Below you can see the steps from setting the template to placing new lamp objects:
If you want to draw an object with a different size, you can simply drag the new object when placing it and thus set the correct size. This means that the template is only used when the new object is drawn or placed by clicking with the mouse on the drawing board.
Show grid lines
This action switches the grid lines of the drawing board on and off. You can adjust the distance between the lines in the Action "Draw-window settings".
Aligning to grid lines
If this action is active (this is the case when a check mark is displayed on the action icon), an object is aligned with the next grid line when moving it with the mouse. It does not matter for the action whether the gridlines are displayed or not.
When the action is inactive, free placement is possible.
Aligning only happens when you move an object with the mouse. If you move the object with the keyboard, then a free placement is always possible.
Show smart guides
If this action is active (this is the case when a check mark is displayed on the action icon), then when you move an object with the mouse, guide lines become visible as soon as corner points of the object have the same coordinates as surrounding objects.
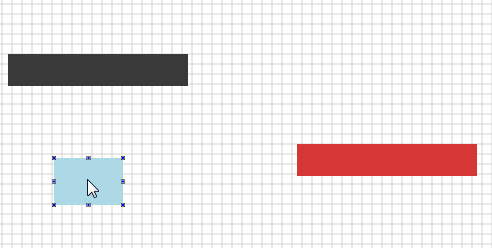
Example In this example, the blue rectangle should be placed so that its left side and the left side of the black rectangle form a vertical line.

When you move the object with the mouse, the guides are displayed as soon as corner pints are identical. When the line which corresponds to the intended placement becomes visible, release the left mouse button. The object is then positioned at the exact location.
Example In this example, the left side of the blue rectangle should form a vertical line with the right side of the black rectangle. Also, the bottom side of the blue rectangle should form a horizontal line with the top side of the red rectangle.
The smart guides help you place an object precisely when you want to align it with the corners or sides of another object. The object is positioned precisely when the left mouse button is released. This also works when the objects are displayed rotated. The smart guide are only displayed for objects that are visible in the current view. Only one vertical and one horizontal line are displayed at a time. If several vertical or horizontal lines are possible, only the lines to the closest placed object are displayed.
Resetting the highlighting of an object
For some actions, objects are highlighted to visually distinguish them from other objects. For example, if a line is selected in the cross-reference of the operands used by double-clicking on it. This remain visible until the action "Reset highliting of objects" is executed.
Stencil for draw-mode
In this section a stencil for the drawing-mode can be set and reset. After setting a stencil, you can only change the position of objects with a certain gradient. The stencils are used in connection with pristmatic joints in order not to change the slope of the linear movement by moving the anchor objects.
You can find more information on how to use stencils here:
Draw-window settings
When the action is executed, the dialog "Draw-window settings" is displayed. The following settings can be made in this dialog.
- Switching the display of the grid lines on or off.
- Switching the alignment of objects on the grid lines when moving them with the mouse on or off.
- The distance (in pixels) between the grid lines.
- The background color of the drawing board.
- Do not use the symbol designation as a label: If this option is selected, the standard behaviour is switched off, in which, e.g. for switch or lamp objects, when assigning a new operand by drag & drop, its symbol is entered as the object's label.
When you exit the dialog with OK, the settings are accepted.