Grafcet-Engine Window
The Grafcet-Engine window is the interface to the device or the simulator:
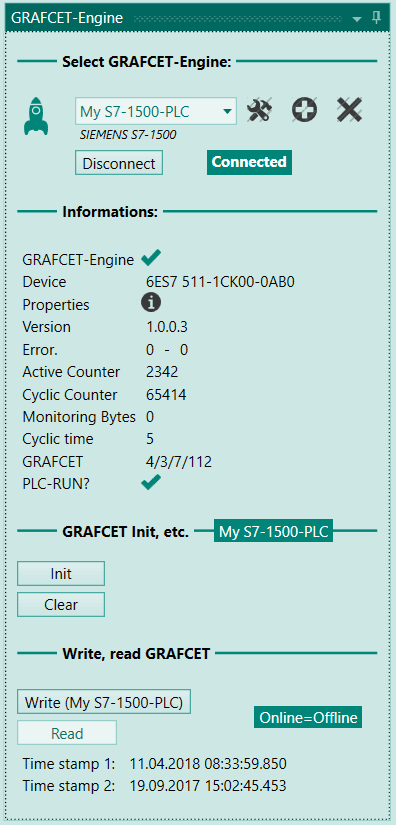
Selecting the Grafcet Engine section
The following options are available in this section:
- Make a selection from a list of devices that you want to use
- Add new devices
- Delete the device from the list
- Establish the connection to the device
- Drop the connection to the device
Information Section
This section contains the following information of the device when it's connected to Grafcet Studio.
| Element | Description |
|---|---|
| Grafcet Engine | Does the Grafcet Engine exist in the device? |
| Device | Order number or device ID |
| Properties | Properties of the Grafcet Engine (limitations) |
| Version | Version of the Grafcet Engine |
| Errors | If no errors are present, "0-0" is displayed. Left-hand digit: [Error detection] (../grafcet-engine-error-detection) right-hand digit: Additional Information |
| Active Counter | If the Grafcet Engine is enabled, this value is always incremented by 1. |
| Cycle Counter | If the Grafcet Engine is in RUN status, this value is always incremented by 1. |
| Monitoring Bytes | How many bytes are processed in monitoring mode? |
| Cycle time | Total cycle time |
| Grafcet | Which Grafcet components are located in the device: Number of steps/Number of transitions/Number of actions/Number of words in the Grafcet command stack |
| RUN PLC? | Is the device (PLC) in RUN status and is the Grafcet Engine called? |
Grafcet init etc. Section
Init and Delete buttons:
| Button | Description |
|---|---|
| Init | The Grafcet is returned to the initial state. All steps are reset. Only the initial steps are set. |
| Delete | The entire Grafcet is deleted in the device. (The Grafcet-Engine in the device will remain.) |
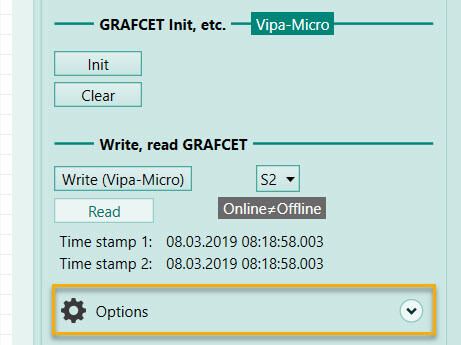
Grafcet write, read section
The Write button writes all Grafcet pages of the current project to the connected device.
The Read button loads the Grafcet pages from the device and writes them to the current project. This function is only available if the device supports it.
Time-stamp information: The time stamp for the Grafcet logic is displayed in the device here. If this time stamp corresponds to the offline time stamp, then the Online Grafcet corresponds to the Offline Grafcet.

Writing options
Info
This feature is possible with Grafcet-Studio version 1.0.3.4 or higher.
In these options you can define which steps are active after writing the grafcet logic. Normally these are always the initial steps. If the machine/hardware has a specific position, it can make sense to set specific steps after downloading the grafcet chart. Exactly this can be configured here.
In the Grafcet standard, the state of the steps is also called situation. The situation determines which steps are active and which are not.
With a mouse click on Options the settings can be opened.
See picture:
Then the following mask appears:
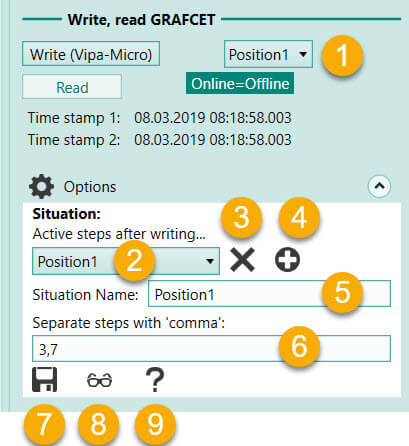
| No | Description |
|---|---|
| 1 | Selection of the situation to be set after writing. This selection is only displayed if situations have been defined. The situation {Init} is always present in this list. This situation activates all initial steps after writing the grafcet. |
| 2 | Select the situation you want to edit. |
| 3 | Delete selected situation. |
| 4 | Add situation. |
| 5 | Name of the situation. |
| 6 | Definition of the situation. Here you can define the steps that should be active after writing the grafcet. |
| 7 | Save current situation. |
| 8 | In watch mode, this icon can be used to insert the currently active steps into the input field. Only visible in watch mode. |
| 9 | Open this help page. |
Procedure if a new situation is to be inserted:
- Press the Plus button (No. 4)
- Define the name of the situation (no. 5)
- In field no. 6, specify the steps that should be active in this situation after writing the grafcet. The steps must be separated by a comma.
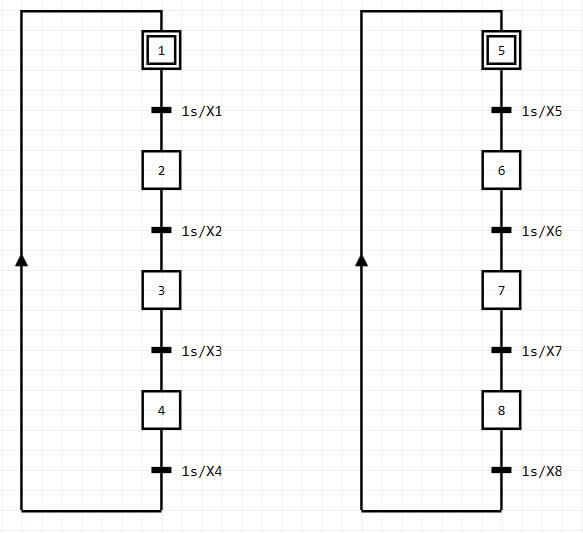
Example: In the following grafcet, the initial steps 1 and 5 are normally activated after writing. However, if you want steps 3 and 7 to be active after writing, the situation can be set: 3,7. After writing, the grafcet logic will run from steps 3 and 7.
Info
The setting of the situations is project-related and is saved in the project file.